
90% of the documents I write, for better or worse, are in LaTeX. For shared projects where revisions and comments are needed, my main tool is Overleaf. However, for projects where I’m the only editor, I’ve found a pretty comfortable workflow in VSCode. First, because it’s my main code editor; second, because I don’t want to download another application just for writing; and third, because it allows the use of language models for free (unlike Overleaf).
What you need to install
We’re talking about VSCode, so I assume that if you’re reading this, you already have it installed. Now, what you need to use LaTeX locally is a compiler. I use macOS, so the one I use is MacTeX. You can download it here. If you use Windows, you can install MikTeX or TeX Live.
Once you have the compiler, go to VSCode and install a couple of extensions. The first is LaTeX Workshop, which will allow you to use the compiler and have syntax highlighting, autocomplete, etc. The second is the GitHub Copilot extension (or your favorite language model extension). I use Copilot because with an educational account, the PRO version is free.
Alright, now go to the top menu and click 'View' -> 'Command Palette' and search for 'Preferences: Open User Settings (JSON)'. Inside, you have to add the following lines:
"latex-workshop.latex.tools": [
  {
    "name": "latexmk",
    "command": "latexmk",
    "args": [
      "-synctex=1",
      "-interaction=nonstopmode",
      "-file-line-error",
      "-pdf",
      "-outdir=%OUTDIR%",
      "%DOC%"
    ],
    "env": {}
  },
  {
    "name": "xelatex",
    "command": "xelatex",
    "args": [
      "-synctex=1",
      "-interaction=nonstopmode",
      "-file-line-error",
      "%DOC%"
    ],
    "env": {}
  },
  {
    "name": "pdflatex",
    "command": "pdflatex",
    "args": [
      "-synctex=1",
      "-interaction=nonstopmode",
      "-file-line-error",
      "%DOC%"
    ],
    "env": {}
  },
  {
    "name": "bibtex",
    "command": "bibtex",
    "args": [
      "%DOCFILE%"
    ],
    "env": {}
  }
]
If your configuration file is not empty, make sure to add a comma at the end of the last line before pasting the code. Now we’re going to do the same with the next configuration: add a comma right after the last closing bracket ']' and paste the following code:
"latex-workshop.latex.recipes": [
  {
    "name": "pdfLaTeX",
    "tools": [
      "pdflatex"
    ]
  },
  {
    "name": "latexmk 🔃",
    "tools": [
      "latexmk"
    ]
  },
  {
    "name": "xelatex",
    "tools": [
      "xelatex"
    ]
  },
  {
    "name": "pdflatex ➞ bibtex ➞ pdflatex`×2",
    "tools": [
      "pdflatex",
      "bibtex",
      "pdflatex",
      "pdflatex"
    ]
  },
  {
    "name": "xelatex ➞ bibtex ➞ xelatex`×2",
    "tools": [
      "xelatex",
      "bibtex",
      "xelatex",
      "xelatex"
    ]
  }
]
How to use it?
First of all, open in VSCode the folder where you’re going to work. Once inside, create a new file with the .tex extension (for example: 'document.tex'). Now you can start writing your LaTeX document. To compile it, simply press 'Cmd + Alt + B', or you have an easier option: after installing LaTeX Workshop, you’ll see a green 'play' icon on the top right bar. Click there and the project will compile. This will generate the PDF in the same folder where your .tex file is located.
How to use language models?
When installing GitHub Copilot, an option appears in the top bar in the form of a chat. Click on it and a sidebar will open where you can type your prompts. Here’s an example image to give you an idea of how it should look:
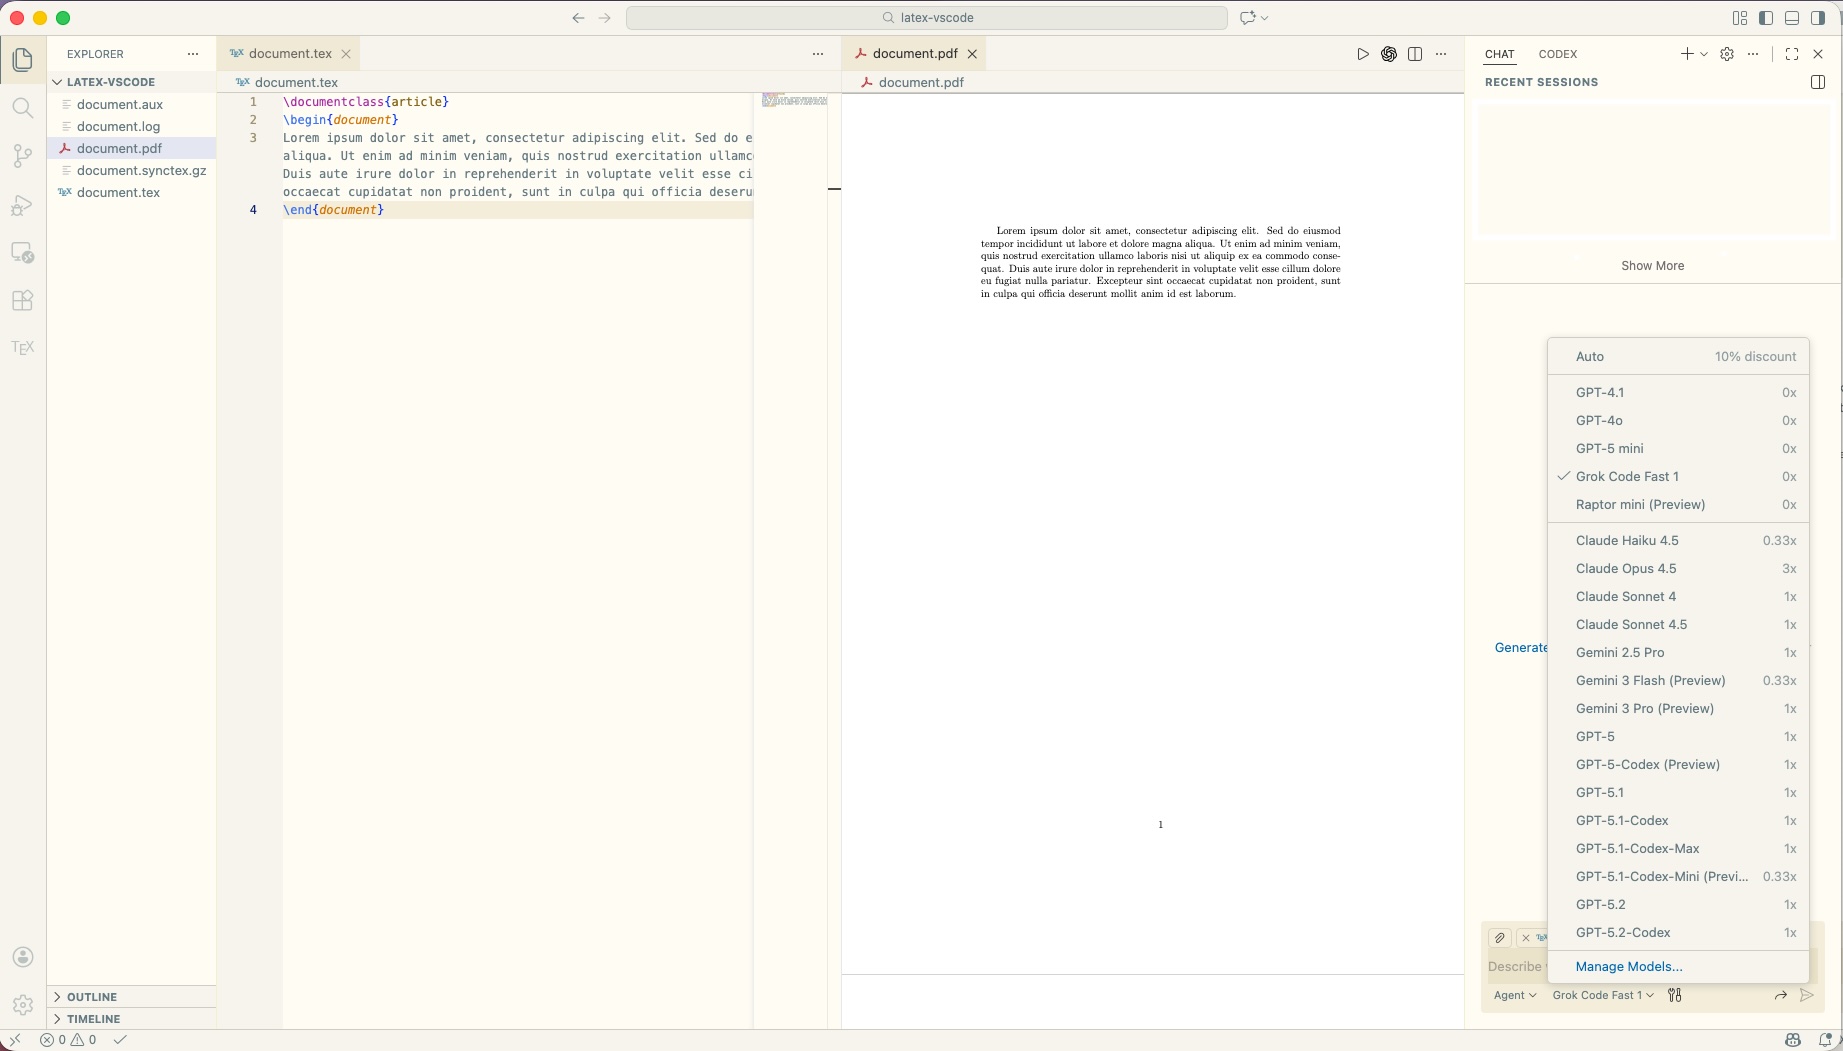
If you click on the model that appears in the chat box, a dropdown like the one in the image will appear. There you can select the model you want to use and how you want to use it. The usage modes are:
- Agent: the model can read, edit, create, and delete files in your project. Ideal for asking it to create document structures, help fix compilation errors, etc.
- Ask: it can only read your project’s files. It’s good for acting as a reviewer of the entire document or specific sections.
- Edit: it can read and edit. Ideal when asking it to help rewrite parts of the document, improve wording, etc.
- Plan: it analyzes your request, checks the project files, and returns an action plan that you can execute yourself or ask it to execute (Agent mode).
Models that appear with 0x are the ones you can use for free and as many times as you want. Then, regardless of whether you have a free or paid account, you also have a number of monthly 'premium' requests. Models shown as 0.33x, 1x, etc. consume those premium requests. For example, if you use Claude Haiku 4.5, each request will subtract 0.33 from your monthly premium quota. If you have a paid account, you won’t have a limit on free requests, but using premium models will still deduct from your monthly quota. I rarely reach the limit, to be honest.
And that’s it! With this setup, you can write LaTeX documents comfortably, locally, and with the help of language models to speed up your workflow. Hope it helps :).